Another extension for Conkeror for browsing Facebook has been released today. This is just the very first version so it has only two features but they are really useful. It provides the ability to scroll through a long news feed page and open the story that you want to read later with ease. Have a look at it homepage, try it, bookmark this page and you’ll be notified when there is a new version release.

Conkeror Extended Facebook Mode: Homepage

In this very first version, I have only implemented 2 features. They are Fallthroughkeys and Open News Feed Story in new buffer

Read more
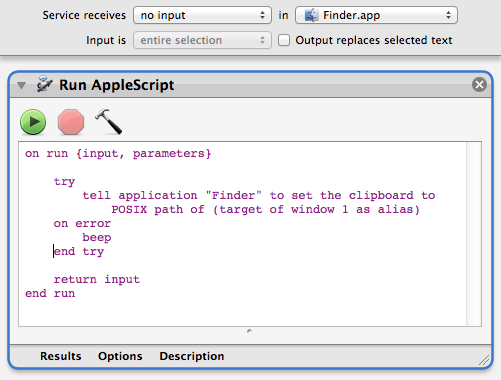

Copying folder path is a regular task that I use almost every day. It would be very useful if I can quickly copy the path that I’m currently working in Finder or Terminal and then switch to other application to continue working on that folder. Finder does not have any built-in feature for copying the current path using the keyboard. However, we can use a workaround with help from Apple Automator.

Finder

To copy the current path in Finder, open Automator and create a new Service. Config this service to receive no input in Finder application. After that, add Run AppleScript action to the work flow. Replace (* Your script goes here *) with this

try
    tell application "Finder" to set the clipboard to POSIX path of (target of window 1 as alias)
on error
    beep
end try

If you want it to copy as quoted, you can change POSIX path to quoted form of POSIX path.

Save the service with a name that you want. Remember that name so we can use it later to bind a shortcut key for it.

Read more

Today, I have finished my first package for Conkeror: Conkeror Mac Modeline Buttons. This is a really useful package for people who are new to Conkeror.

The source code is hosted on Github at https://github.com/tmtxt/conkeror-mac-modeline-buttons. The information as well as the instruction on how to install and use is presented on the homepage at Conkeror Mac Modeline Buttons.

This is the demo picture. Give it a try and comment me anything that I can improve

Demo

Read more

MacOS comes with a powerful search tool, Spotlight, that helps us find any file in our computer at a glance. It’s would be great if we can integrate it with Emacs and use it as a replacement for the default Emacs’ find-file command so that we can jump to any file we want to edit without remembering the location. Luckily, there is an useful program called mdfind, a command line interface for Spotlight. We will use it in combination with the locate (or helm-locate if you’re using helm) command.

1. Emacs built-in “locate” command

The step to use Spotlight with locate command is really simple. You just need to set the variable locate-command to mdfind to let Emacs use mdfind instead of locate for searching file.

(setq locate-command "mdfind")

When you want to use it, type in M-x locate and enter the keyword to search. The result will be displayed in a new buffer. Simply press Return on the file to open it for editing. If you follow the instruction in this post Dired as Default File Manager - More Advanced Tips on how to open file using MacOS default program, you can use that function/keystroke to open the file in search result with that default program.

This method is super fast since Spotlight has already indexed your Mac while you use it. Usually, it takes me just 1-2 seconds to display all the result and it’s can be faster on a Mac running an SSD.

Read more

Emacs is my favorite text editor and I use it as the main one for composing my blog. However, sometimes when I’m typing too fast and I’m lazy to proofread my article to some minor spelling error. Now I find a built-in solution in Emacs to help me automatically find any spelling errors in my article.

Emacs is shipped with flyspell-mode and ispell, which use a command line program for check the spelling. In most GNU/Linux distros, these programs are pre-installed in the OS so you don’t need to do anything in order to use flyspell-mode, just type M-x and flyspell-mode.

However, MacOS is not shipped with any spell checker program so you will receive the error Searching for program: No such file or directory when you try to activate flyspell-mode in Emacs. We need to configure a bit for Emacs on MacOS to run properly.

First, you need to install aspell, a spell checker program from macports. If you’re not familiar with macports, have a look at this post MacPorts - The MacOS package manager. Install aspell from macports using this command

Read more

Although I’m using emacs dired as my default file manager, I don’t like any of the terminal emulators in Emacs at all. I usually use a separate application for working with shell command (iTerm on Mac). The problem is that when I’m browsing my files in Emacs and I want to open terminal for doing shell commands in the current directory, I have to copy the path of the current directory, open terminal and type cd to that folder.

I’ve written a small function to help me quickly open a new terminal window at the current directory that I’m browsing in Emacs (MacOS only).

;; default terminal application path
(defvar tmtxt/macos-default-terminal-app-path
	"/Applications/Terminal.app" "The default path to terminal application in MacOS")
;;; function to open new terminal window at current directory
  (defun tmtxt/open-current-dir-in-terminal ()
	"Open current directory in dired mode in terminal application.
For MacOS only"
	(interactive)

	(shell-command (concat "open -a "
						   (shell-quote-argument tmtxt/macos-default-terminal-app-path)
						   " "
						   (shell-quote-argument (file-truename default-directory)))))
Read more

This is just the result of my assignment at university

Overview of the website

The website is about an Electronic Medical Record (EMR) system that support management patient treatment in medical facility such as clinic or hospital. Detail requirements can be found in the pdf file inside the repo on github.

Functional details

The website allows users to manage and maintain the record of medical services provided by various hospitals. It focuses mainly on patients and their visit history as well as the symptoms, prescriptions and lab orders of each visit.

These are some main entities in the application: Patient, Doctor, Hospital, Visit, Prescription, Lab Order, Drug, Drug Group, Medical Service, Medical Service Group, ICD, ICD Chapter and User. For each entity, the website provides 6 basic operations: add new, update, delete, view all, view one item and search.

Read more

In most browsers, the Esc key is used to stop the browser from loading a web page. In some web pages, for example Facebook, the Esc key has other functionality. When you click on an image on Facebook, another layer for displaying that image will appear. If the Esc key is pressed, that layer will disappear and you will be taken to the previous page. Similar things happen in some gallery pages, too.

However, in Conkeror, when the Esc key is pressed, the browser will release the focus on the currently focused element (if any) and after that move the focus to the top frame. In some circumstances, it can cause problem when both the current element will lost the focus and the web page will also execute the special funationality bind to Esc while you want only one of them to be activated.

Look at this example below, you cursor is now inside a textbox. After typing some text, you want to unfocus the current textbox and then follow the button (Share Photo) to share that post to your timeline. But if you press Esc, the dialog will disappear because Facebook also bind the Esc key to Close the dialog.

Read more

Introduction

cover

A free Dropbox account with 2GB of storage (can be up to 30GB for completing some goals) seems to be not enough for our need. Also, for some people, they want to separate Dropbox into 2 accounts, one personal use and one for business. However, normally, we can use just one dropbox account at a time on our computer. This article will demonstrates two methods to bypass Dropbox desktop application and force it to run with multiple accounts concurrently.

Run as another user

Have a look at the this post Exploit Unix user account feature, especially the second part to know how this method works. The syntax of command looks similar to this

$ su username -c dropbox

This is tested successfully on MacOS, Linux Mint with Cinnamon desktop environment. On Ubuntu Linux with Unity, KDE and XFCE desktop, I think there is a problem with the GUI, which prevents Dropbox from running using this method.

If you are on MacOS, you can refer to this article MacOS - Using multiple Google Drive accounts at the same time. You can follow the instruction there with a few changes to automate everything on MacOS.

Read more

It’s a bit complicated when I first setup VirtualBox to boot a virtual machine from my Bootcamp partition on my Mac. Unlike Parallel where everything is automatically set up, in VirtualBox, we need to manually create the virtual machine file by command line and change the permission properly for the virtual machine to work. This is a summary of what I have configured as well as how to automate everything.

Change the permission

You need to change the permission of the volume so that VirtualBox can read and write on it. Open terminal and execute the command

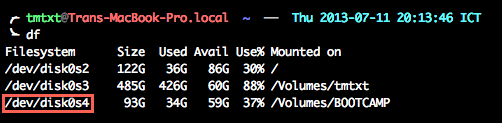
$ df -h

df

Locate your bootcamp partition, remember the corresponding file in /dev folder. Next, change the permission of that file and disk0 (can be disk1, disk2,… in your case).

$ sudo chmod 777 /dev/disk0 /dev/disk0s4

Unmount Bootcamp partition

Assume that the Bootcamp partition has the name BOOTCAMP, we need to eject this volume. There are several ways to do this. You can open Finder and click eject the drive or eject it in disk utility. However, I prefer command line and also I will use it later for the automation step. This is the command for unmounting the volume

Read more