It’s a bit complicated when I first setup VirtualBox to boot a virtual machine from my Bootcamp partition on my Mac. Unlike Parallel where everything is automatically set up, in VirtualBox, we need to manually create the virtual machine file by command line and change the permission properly for the virtual machine to work. This is a summary of what I have configured as well as how to automate everything.
Change the permission
You need to change the permission of the volume so that VirtualBox can read and write on it. Open terminal and execute the command
$ df -h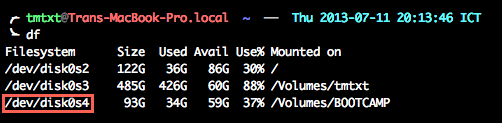
Locate your bootcamp partition, remember the corresponding file in /dev folder. Next, change the permission of that file and disk0 (can be disk1, disk2,… in your case).
$ sudo chmod 777 /dev/disk0 /dev/disk0s4Unmount Bootcamp partition
Assume that the Bootcamp partition has the name BOOTCAMP, we need to eject this volume. There are several ways to do this. You can open Finder and click eject the drive or eject it in disk utility. However, I prefer command line and also I will use it later for the automation step. This is the command for unmounting the volume
$ diskutil unmount /Volumes/BOOTCAMPCreate the virtual machine file
Use this command to create the virtual machine file, replace the number at the end with the last number of the file we have changed the permission before.
$ cd ~
$ sudo VBoxManage internalcommands createrawvmdk -rawdisk /dev/disk0 -filename win7raw.vmdk -partitions 4
We also need to change the permission to those newly created files to the current user.
$ sudo chown your-user-name *.vmdkConfig and Run the virtual machine
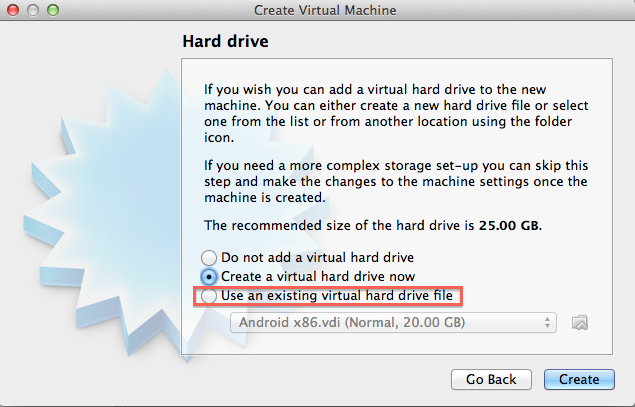
Open VirtualBox, create a new virtual machine normally. The important step is when it asks you whether you want to create a new hard disk file or using an existing one, select Use an existing virtual hard drive file and point the the file that we have just created before.
Now start your virtual machine a see the magic
Install Guest Additions
You cannot use the virtual machine in full screen mode with full screen resolution unless you install VirtualBox Guest Addition. After booting into your virtual machine, select Devices on the menu, Install Guest Additions and follow the instruction on the screen
Automate everything
Don’t be happy too soon because everytime you restart your Mac, the permission will be all gone. To let the computer automatically set the permission each time you start your computer, create a file named fix-virtualbox.sh with the content like this
# unount bootcamp partition
diskutil unmount /Volumes/BOOTCAMP

# change the permission
chmod 777 /dev/disk0 /dev/disk0s4
Next, change the permission for the file with the command
$ chmod +x fix-virtualbox.shFinally, open Automator application, select Run AppleScript and drag it into your workflow. Paste this script into the workflow, replace the sudopassword with your password for sudo account
set sh to "path/to/fix-virtualbox.sh"
do shell script sh password "sudopassword" with administrator privileges
Save the project into an application and let it start with the OS.