
Installing python and all its stuff maybe a bit confusing if you’re installing it using Macports (MacPorts - The MacOS package manager). By default, Macports comes with many python ports, e.g., python24, python27, python34. Each of them is a separate version of python (2.4, 2.7, 3.4,…). It provides the users the ability to install and maintain multiple version of python at the same time.

To browse all versions of python provided by Macports, use this command

$ port search python
python26 @2.6.9 (lang)
    An interpreted, object-oriented programming language
python27 @2.7.6 (lang)
    An interpreted, object-oriented programming language

To install a specific version of python

$ port install python24 python27

When you install python through Macports, it will auto install the python_select port. This is a tool for switching among python versions. To view all the the installed python versions, execute this one

Read more

The built-in js-mode in Emacs does not provide many features for working with js framework beside js editing and syntax highlighting. The tips in this post will help you transform your Emacs into a powerful Javascript IDE.

Associate files with js mode

By default, open a file with .js extension will automatically activate js-mode. For some other file types, if you want to link them to js-mode, add this to your .emacs

(add-to-list 'auto-mode-alist '("\\.json$" . js-mode))

js2-mode - A better js mode for Emacs

js2-mode by SteveYegge is arguably the best JavaScript mode available for emacs. It has very accurate syntax highlighting, supports newer JavaScript extensions implemented in SpiderMonkey, and highlights syntax errors as you type.

The easiest way to install js2-mode is via package.el (Emacs Package Manager). Also, you need to install ac-js2 for using js2-mode with auto-complete suggestion. Once installed, add this to your .emacs to activate js2 and its auto-complete.

(add-hook 'js-mode-hook 'js2-minor-mode)
(add-hook 'js2-mode-hook 'ac-js2-mode)
Read more

Paredit is a minor mode for keeping parenthese balanced. It is extremely useful for working with lisp-based programming languages. Also, it is activated automatically when you open any lisp-based languages file. Usually in other languages, we have to work with parentheses, too. For example the { and } for code block, [ and ] for array… To use paredit with non-lisp mode, add the following function into your .emacs file

(defun my-paredit-nonlisp ()
  "Turn on paredit mode for non-lisps."
  (interactive)
  (set (make-local-variable 'paredit-space-for-delimiter-predicates)
       '((lambda (endp delimiter) nil)))
  (paredit-mode 1))

Actually, this is taken from Emacs Starter Kit so if you are using Emacs Starter Kit, the above function is added already for you as esk-paredit-nonlisp. Emacs Starter Kit also activates it by default for you in some modes (javascript for example). Now, if you want to activate paredit for a certain mode, add this to your .emacs

Read more

JSHint command line tool

JSHint is a tool that helps to detect errors and potential problems in your JavaScript code. You can try the online demo version at JSHint home page at http://www.jshint.com/. This post demonstrates how to setup jshint and integrate it into Emacs for javascript development on Nodejs.

Firstly, make sure you have installed nodejs and its package manager (npm). Next, install jshint globally using npm with this command

$ npm install -g jshint

You can try linting your js file with jshint

$ jshint myfile.js

JSHint with Flycheck

Before that, I used jshint with flymake. However, now I found that flycheck (an improvement of flymake) has built-in support for jshint so you don’t need to install jshint-mode anymore. Just install flycheck using package.el (Emacs Packages Manager). Add this to your .emacs to activate flycheck when you visit any .js file

Read more

The problem

Usually, in Conkeror, when you want to bind a keystroke to a command or function in a key map, you would use the define_key function (see more at Conkeror Key Bindings). However, when you have too many key bindings, it will lead to the problem of repetition in your config code. For example

define_key(default_global_keymap, "A-z", previous_buffer);
define_key(default_global_keymap, "C-j", previous_buffer);
define_key(default_global_keymap, "A-x", next_buffer);
define_key(default_global_keymap, "C-l", next_buffer);

This is extremely annoying since I have to rebind too many keys in Conkeror (the Emacs style keys is inefficient). Luckily, the flexibility of Javascript allows us dynamically define the number of arguments that passed to the function. By using that, you can define your own function for binding the keys to avoid repetition in your init code.

Read more

On OSX, when I use wget for downloading file from https source, I got the Certificate issue error.

Resolving fbcdn-profile-a.akamaihd.net (fbcdn-profile-a.akamaihd.net)... 23.2.16.8, 23.2.16.41, 23.2.16.32, ...
Connecting to fbcdn-profile-a.akamaihd.net (fbcdn-profile-a.akamaihd.net)|23.2.16.8|:443... connected.
ERROR: The certificate of ‘fbcdn-profile-a.akamaihd.net’ is not trusted.
ERROR: The certificate of ‘fbcdn-profile-a.akamaihd.net’ hasn't got a known issuer.

The reason for this problem is that the default certificate directory is hard-coded in wget as /etc/ssl/certs, which corresponds to the Linux directory layout and doesn’t exist on Mac OS.

To fix this, you can either tell wget to skip certificate check or fix the certificate error in Mac OS. For the first solution, just add --no-check-certificate to the wget command when you start it. For example

$ wget --no-check-certificate http://example.com

If you want to fix the problem, first, install curl-ca-bundle from Macports

$ sudo port install curl-ca-bundle

Next, edit your ~/.wgetrc file (create a new one if it’s not exist yet) and add this line to the end of the file

CA_CERTIFICATE=/opt/local/share/curl/curl-ca-bundle.crt

If you have followed my previous post on How to install and run Macports form home directory, then the link to curl-ca-bundle should be

CA_CERTIFICATE=~/macports/share/curl/curl-ca-bundle.crt
Read more

Usually, there are many opening tabs in my Conkeror (more than 50). However, sometimes Conkeror on MacOS got trouble when quitting which prevents it from auto saving the session file or even worse the session file will appear empty next time Conkeror starts. That makes me lose many opening tabs that I’m reading and I cannot remember which tabs I need to re-open. The solution is using Git for managing, backing up the session file.

Firstly, in order to manage the session file, we need to locate it on our computer. On Mac OS, the Conkeror session file is stored under /Volumes/tmtxt/Library/Application Support/conkeror/Profiles/profile-name/sessions/. Create a git repository there. After that, we need a script that automatically add all the files to staged area and commit with the message containing the current time. The content of the script looks similar to this

now=$(date +"%T")

cd "~/Library/Application Support/conkeror/Profiles/profile-name/sessions/"
git add .
git commit -m "Session at $now"

Finally, hooking the function to run the script into Conkeror.

add_hook("create_buffer_hook", function(buffer){
  shell_command_blind("sh /path/to/conkeror/session/backup/script");
});

Every time a new buffer is created, Conkeror will auto call the script to commit it to git. If you want, you can add hook when a buffer is killed.

Read more

There are several ways of installing Conkeror on Mac OS X but I prefer using the conkeror_mac_bundle script for quickly building the Conkeror application and easily setting it as default browser on Mac OS. For instruction on how to install Conkeror using this method, refer to this page Installation Instructions for OS X.

The only problem with conkeror_mac_bundler script is that you are not able to run shell command directly in Conkeror. The reason is because it cannot find conkeror-spawn-helper in the load path. However, conkeror-spawn-helper is already included when the script build the Conkeror bundle. You can find it under the folder Contents/MacOS inside the Conkeror.app bundle.

Once you find it, add this code to your .conkerorrc file and change the path corresponding to the real location on your computer

PATH.push("~/Applications/conkeror_mac_bundler/Conkeror.app/Contents/MacOS");

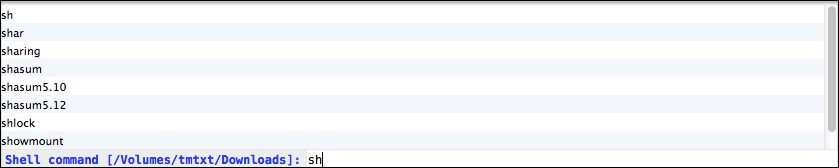
That’s everything you need to do. Restart Conkeror and try it by pressing M-x and then shell-command. You can also use TAB completion there.

Alt Text

Alt Text

Read more

minecraft

Set up Minecraft server

First, download the Minecraft Multiplayer Server executable jar file from its download page here https://minecraft.net/downloadLink. When you finish, place the .jar file inside a folder named minecraft in your home directory. Open Terminal, cd to the minecraft directory you’ve just created before and execute this command to start a Minecraft server

$ java -Xmx1024M -Xms1024M -jar minecraft_server.jar

If you want to run it without GUI, add nogui argument at the end of the command. For the first time, it will generate the game contents and place them inside the minecraft folder above. After it have finished generating, stop the server and open the minecraft directory before, you will see a file named server.properties there. All the server properties are described here http://minecraft.gamepedia.com/Server.properties. Take a look at that page and config the server to what you want. If you don’t want the server to authenticate username with Minecraft server, change online-mode to false to prevent this.

Read more

Finding text in Emacs

When working with a project with large number of files, there will be the case that we cannot remember where a piece of text come from or we want to search where one function, variable is used. There are many ways to achieve this and using the grep command in combination with Emacs is a very efficient method.

1. find-grep, grep-find and rgrep

The command find-grep (also aliased as grep-find), which you can activate via M-x, helps you run grep via find and then display all the results in a *grep* buffer. To use it, simply open the directory you need to find in dired mode and call find-grep. The command is already filled for you. All you need is to type the string pattern and press RET for grep to start working. All the result will be display in a new window, just select the item you want and hit RET to visit that file.

rgrep is another impressive command which behave similar to find-grep but it’s more interative and has more configuration to play with. Once activated, rgrep will ask you for the search string regex (default is the word at point), file types to search for (all or just one specific file type) and the base directory (default is the current working directory). Also, you can config rgrep to skip specified files or folders by add them to the two variables grep-find-ignored-files and grep-find-ignored-directories.

Read more