
Gulp Task runner

Gulp is a task runner written in Javascript and run on Nodejs (similar to Grunt). It helps you to automate your daily boring, repetitive and time consuming development tasks when working with Javascript. Some examples of those tasks are compiling LESS file to CSS, browserify modules, compiling and uglify JS files. Simply defining those tasks in a task file and Gulp will take care of the rest for you. This post shows how to install and config Gulp as well as the basic usage.

Installation

You can install Gulp using Nodejs packages managing system

$ npm install -g gulp

Also, you will need to install Gulp locally inside your project to in order to load the module

$ npm install --save-dev gulp

Next, install some required Gulp plugins, I will explain about these plugins later

$ npm install --save-dev gulp-uglify gulp-rename gulp-jshint
Read more

Zoom behavior in d3js

Zooming functionality is a very useful feature for working with large and complicated svg diagram. Often for those types of graph, zoom ability allows users to have a detail view of one specific part on that graph. Fortunately, creating zoom behavior in d3js is an uncomplicated task since the library already takes care of it all for you. Everything you need to do is to apply the zoom function function on the svg element that you want. For example

// create the zoom listener
var zoomListener = d3.behavior.zoom()
  .scaleExtent([0.1, 3])
  .on("zoom", zoomHandler);

// function for handling zoom event
function zoomHandler() {
  vis.attr("transform", "translate(" + d3.event.translate + ")scale(" + d3.event.scale + ")");
}

// create the svg
rootSvg = d3.select("#tree-body").append("svg:svg");
/*
  creating your svg image here
*/

// apply the zoom behavior to the svg image
zoomListener(rootSvg);
Read more

In my previous post, I have demonstrated how to use aria2 as the main downloader on Unix/Linux (Aria2 as Default Download Manager on Unix/Linux). However, there is still one thing missing. That is browser integration. Luckily, Conkeror allow me to customize it very easily through the init file. To achieve, you need to modify the content_handler_prompt function in content-handler.js file. Add this to your .conkerorrc file for it to overwrite the conkeror’s built in one (sadly, I haven’t found any better solution).

function content_handler_prompt (ctx) {
  var action_chosen = false;
  var can_view_internally = ctx.frame != null &&
    can_override_mime_type_for_uri(ctx.launcher.source);
  var panel;
  try {
    panel = create_info_panel(ctx.window, "download-panel",
                              [["downloading", "Downloading:", ctx.launcher.source.spec],
                               ["mime-type", "Mime type:", ctx.launcher.MIMEInfo.MIMEType]]);
    // add my own option (a for aria2)
    var action = yield ctx.window.minibuffer.read_single_character_option(
      $prompt = "Action to perform: (s: save; o: open; O: open URL; c: copy URL; a: aria2; "+
        (can_view_internally ? "i: view internally; t: view as text)" : ")"),
      $options = (can_view_internally ? ["s", "o", "O", "c", "a", "i", "t"] : ["s", "o", "O", "c", "a"]));
    switch (action) {
    case "s":
      yield content_handler_save(ctx);
      action_chosen = true;
      break;
    case "o":
      yield content_handler_open(ctx);
      action_chosen = true;
      break;
    case "O":
      yield content_handler_open_url(ctx);
      action_chosen = true;
      break;
    case "c":
      yield content_handler_copy_url(ctx);
      action_chosen = true;
      break;
    case "i":
      yield content_handler_view_internally(ctx);
      action_chosen = true;
      break;
    case "t":
      yield content_handler_view_as_text(ctx);
      action_chosen = true;
      break;
    case "a":
      yield content_handler_add_to_aria2(ctx);
      action_chosen = true;
      break;
    }
  } catch (e) {
    handle_interactive_error(ctx.window, e);
  } finally {
    if (! action_chosen)
      ctx.abort();
    if (panel)
      panel.destroy();
  }
}
Read more

Update Jun 21 2014: add another better solution that uses web-mode

1. Syntax highlighting

If you are working with Javascript, especially ReactJS, you definitely have known about JSX, the XML syntax inside of Javascript. This section will demonstrate how to setup Emacs for working with JSX files using web-mode, an autonomous emacs major-mode for editing web templates. For web-mode to work properly with JSX files, add this to your .emacs

(add-to-list 'auto-mode-alist '("\\.jsx$" . web-mode))
(defadvice web-mode-highlight-part (around tweak-jsx activate)
  (if (equal web-mode-content-type "jsx")
      (let ((web-mode-enable-part-face nil))
        ad-do-it)
    ad-do-it))

This is how web-mode indents and highlights my jsx files (taken from my Emacs).

2. JSX Syntax Checking

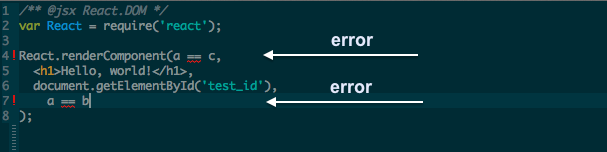
Alt Text

Next, we need a tool for syntax checking. For Javascript, we have jslint (or jshint), which I have previously written another post about how to set it up in Emacs here Emacs - Setup JSHint for on-the-fly (potential) errors checking. For JSX, there is a similar tool called jsxhint. Of course, you need to install it before you can use

Read more

By default, Sequelize (an ORM system for NodeJS) only allows you to specify custom table name. Currently, there is no such feature in Sequelize to help you define custom column names and then map them to properties in model objects. To achieve this, you may need a workaround that is to use getter and setter methods provided by Sequelize. When you creating the model, set the property names to the same with the corresponding column name in database first. After that, define the setter and getter functions to map those column to the desired properties name that you want. This example transforms model properties name from snake_case (SQL style) to camelCase (JS style).

var model =
	sequelize.define('People', { 
    name: Sequelize.INTEGER,
    birth_date: Sequelize.DATE, // should be the same with
    death_date: Sequelize.DATE  // column name in database
  }, {
    // getters and setters
    getterMethods: {
      birthDate: function(){return this.getDataValue("birth_date");},
      deathDate: function(){return this.getDataValue("death_date");}
    },
    setterMethods: {
      birthDate: function(v){this.setDataValue("birth_date", v);},
      deathDate: function(v){this.setDataValue("death_date", v);}
    },
    timestamps: false,
    tableName: "people"
	});

Later, when you want to create a new instance, you can use the birthDate instead of birth_date.

Read more
This post is the seventh part of the series Dired as Default File Manager

Wdired is a special mode that allows you to perform file operations by editing the Dired buffer directly (the “W” in “Wdired” stands for “writable”.). Imagine that you want to rename multiple files, you will have to call the rename command several times. Wdired help you to transform the current dired buffer to an editable one, then you can change multiple file names and apply the changes. To activate it, simply run the command dired-toggle-read-only (bound to C-x C-q by default). When you finish, just call wdired-finish-edit (C-c C-c) to commit the changes or wdired-abort-changes (C-c C-k) to cancel.

This is much faster comparing to the other GUI file managers. However, it's still not very convenience since you still have to mark the text that you want to change. Also, in normal file manager, when you rename one file, it will auto select the file name exclude the extension for you to edit. This can be achieved easily using a little emacs lisp.

Read more

Introduction

When dealing with hierarchical data, we usually use recursion for constructing the tree structure. It would be a performance problem if you query the tree node data from the database every time the recursion happens. Also, if you work with languages which are heavily based on callback like Javascript, you will find it is very difficult to deal with the recursion because you have to determine when the callback has finished execution. Luckily, PostgreSQL supports recursive query using the WITH RECURSIVE keyword. All the data structure can be returns within a single query.

WITH queries in PostgreSQL

According to PostgreSQL document, WITH queries provide a method for dealing with large queries by creating temporary tables that exist only for that query. This is a very simple example from Postgres document to illustrate the usage of WITH queries.

Read more

Installation & Configuration

There are several ways to install PostgreSQL on Mac OS. Take a look at this page Mac OS X packages choose one method that best suits for you. In this post I will use the Graphic installer as the demo but you can also use other way, there will be not many differences.

After you have downloaded and installed PostgreSQL using the graphic installer, there will be a new account named postgres and the server will automatically start. Now you need to add the postgres executable files into your shell’s PATH. Luckily, the graphic installer has generated the configuration for you already. Just add this line to the end of your shell rc file (.bashrc, .zshrc)

source /Library/PostgreSQL/9.3/pg_env.sh

Restart your shell and now those postgres binary files (postgres, pg_ctl, psql,… ) is ready for use. But there is still one problem, it is the postgres user in your system. You need to update its password so later you can log into that account. Open System Preferences > Users & Groups and then choose Reset Password of the postgres account.

To start the server, use this command and then input the password of the postgres account.

$ su postgres -c "pg_ctl start"

Password:
server starting
2014-02-26 10:09:20 ICT LOG:  redirecting log output to logging collector process
2014-02-26 10:09:20 ICT HINT:  Future log output will appear in directory "pg_log".
Read more

Sequelize is an Object-Relational-Mapper, which is written entirely in Javascript and can be used in the Node.JS environment. However, setting it up might seem a little messy since the document does not cover everything that it can do. In this post, I only cover some basic information as well as some tips that you cannot find in the Sequelize Docs.

1. Setting up Sequelize

1.1 Installing Sequelize

In order to use Sequelize, you need to install it along with the database engine of your choice. For example

$ npm install --save sequelize
$ npm install --save pg       # for postgres
$ npm install --save mysql    # for mysql
$ npm install --save sqlite3  # for sqlite
$ npm install --save mariasql # for mariasql
Read more