Recently, I was working on one assignment about OSGI framework in Java. At first sight, I was excited about its idea of dynamically changing the .jar module while the application is running. However, I soon gave up with OSGI since it’s too complex and there are little documents about OSGI on the internet. OSGI with Spring Dynamic Modules requires too many config to run just a simple application. Also, there were many bugs and exceptions happened while I was working with it but I cannot not find the solution due to the lack of help/document about OSGI on the internet.
Finally, I ended up with a simple application using OSGI with Spring Dynamic Module and JDBC for working with databse. I was not successful in making a web, CLI or GUI application because of some bugs that I don’t where they came from so that the application is just like a main function automatically calls all the functions inside the provider bundle. Hopefully, in the future I will have the chance to research more about this technology to enhance this application. Here are steps of how to make that simple application. I also included the source code so you can download it to test.
Setting up the database
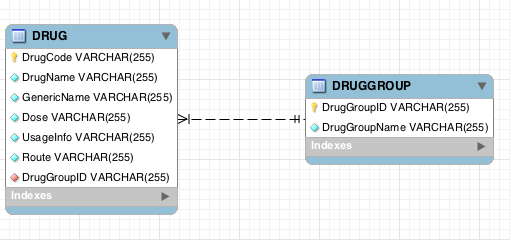
First you need to setup the database. In my example, I used MySQL and MySqlJDBC for connecting to the database. Create a new database named test_osgi in your MySql. After that, create 2 tables with the structure like this
CREATE  TABLE IF NOT EXISTS `test_osgi`.`DRUGGROUP` (
  `DrugGroupID` VARCHAR(255) NOT NULL ,
  `DrugGroupName` VARCHAR(255) NOT NULL ,
  PRIMARY KEY (`DrugGroupID`) )
ENGINE = InnoDB
DEFAULT CHARACTER SET = latin1;

CREATE  TABLE IF NOT EXISTS `test_osgi`.`DRUG` (
  `DrugCode` VARCHAR(255) NOT NULL ,
  `DrugName` VARCHAR(255) NOT NULL ,
  `GenericName` VARCHAR(255) NOT NULL ,
  `Dose` VARCHAR(255) NOT NULL ,
  `UsageInfo` VARCHAR(255) NOT NULL ,
  `Route` VARCHAR(255) NOT NULL ,
  `DrugGroupID` VARCHAR(255) NOT NULL ,
  PRIMARY KEY (`DrugCode`) ,
  INDEX `FK2027A0337E4654` (`DrugGroupID` ASC) ,
  CONSTRAINT `FK2027A0337E4654`
    FOREIGN KEY (`DrugGroupID` )
    REFERENCES `test_linh`.`DRUGGROUP` (`DrugGroupID` ))
ENGINE = InnoDB
DEFAULT CHARACTER SET = latin1;
This is the diagram of the two tables. They are just very simple tables. Each Drug Group contains many Drugs.
OSGI Provider bundle
- Maven Project
Next, you need to create a provider bundle, which will talk to the database and return the result for the calling consumer bundle. Create a new Maven project using any IDE or text editor that you like. In my example, the project is named DAO. When you have finished creating the project, open the project’s pom.xml file and add this content to it. I’ll explain further later
<?xml version="1.0" encoding="UTF-8"?>
<project xmlns="http://maven.apache.org/POM/4.0.0"
         xmlns:xsi="http://www.w3.org/2001/XMLSchema-instance"
         xsi:schemaLocation="http://maven.apache.org/POM/4.0.0 http://maven.apache.org/xsd/maven-4.0.0.xsd">
    <modelVersion>4.0.0</modelVersion>

    <groupId>DAO</groupId>
    <artifactId>DAO</artifactId>
    <version>1.0-SNAPSHOT</version>
    <packaging>bundle</packaging>

    <dependencies>
        <dependency>
            <groupId>mysql</groupId>
            <artifactId>mysql-connector-java</artifactId>
            <version>5.1.27</version>
        </dependency>
    </dependencies>

    <build>
        <plugins>
            <plugin>
                <groupId>org.apache.maven.plugins</groupId>
                <artifactId>maven-compiler-plugin</artifactId>
                <version>2.0.2</version>
                <configuration>
                    <source>1.6</source>
                    <target>1.6</target>
                </configuration>
            </plugin>
            <plugin>
                <groupId>org.apache.felix</groupId>
                <artifactId>maven-bundle-plugin</artifactId>
                <extensions>true</extensions>
                <configuration>
                    <instructions>
                        <Bundle-SymbolicName>DAO</Bundle-SymbolicName>
                        <Export-Package>tln.able, tln.model</Export-Package>
						<Import-Package>tln.able;version="[1.0,2)",org.osgi.fra
                            mework,com.mysql.jdbc</Import-Package>
                        <Bundle-Vendor>Truong Linh Nhan</Bundle-Vendor>
                    </instructions>
                </configuration>
            </plugin>
        </plugins>
    </build>
</project>
- Model classes
Now we need to create model classes which represent objects in database. Create 2 new classes DrugGroup and Drug in the package tln.model. These 2 objects has nothing special to do. They are just Plain Old Java Objects, containing some properties which reflects the object in database.
The DrugGroup class
public class DrugGroup {
    private String drugGroupID;
    private String drugGroupName;
    private Set drugs;

    public DrugGroup(){
    }

    public DrugGroup(String id, String name){
        drugGroupID = id;
        drugGroupName = name;
    }

    public Set getDrugs() {
        return drugs;
    }

    public void setDrugs(Set drugs) {
        this.drugs = drugs;
    }

    public String getDrugGroupName() {
        return drugGroupName;
    }
    public void setDrugGroupName(String drugGroupName) {
        this.drugGroupName = drugGroupName;
    }
    public String getDrugGroupID() {
        return drugGroupID;
    }

    public void setDrugGroupID(String drugGroupID) {
        this.drugGroupID = drugGroupID;
    }
}
The Drug class
public class Drug {
    private String drugCode;
    private String drugName;
    private String genericName;
    private String dose;
    private String usage;
    private String route;
    private String drugGroupID;

    public Drug(){

    }

    public Drug(String drugCode, String drugName, String genericName, String dose, String usage, String route, String drugGroupID){
        this.drugCode = drugCode;
        this.drugName = drugName;
        this.genericName = genericName;
        this.dose = dose;
        this.usage = usage;
        this.route = route;
        this.drugGroupID = drugGroupID;
    }

    public String getDrugGroupID() {
        return drugGroupID;
    }

    public void setDrugGroupID(String drugGroupID) {
        this.drugGroupID = drugGroupID;
    }

    public String getDrugCode() {
        return drugCode;
    }

    public void setDrugCode(String drugCode) {
        this.drugCode = drugCode;
    }

    public String getDrugName() {
        return drugName;
    }

    public void setDrugName(String drugName) {
        this.drugName = drugName;
    }

    public String getGenericName() {
        return genericName;
    }

    public void setGenericName(String genericName) {
        this.genericName = genericName;
    }

    public String getDose() {
        return dose;
    }

    public void setDose(String dose) {
        this.dose = dose;
    }

    public String getUsage() {
        return usage;
    }

    public void setUsage(String usage) {
        this.usage = usage;
    }

    public String getRoute() {
        return route;
    }

    public void setRoute(String route) {
        this.route = route;
    }

    public boolean equals(Object obj){
        if(obj == null) return false;
        if (!this.getClass().equals(obj.getClass())) return false;

        Drug caster = (Drug) obj;
        if (this.drugCode.equals(caster.getDrugCode()) ){
            return true;
        } else{
            return false;
        }
    }

    public int hashCode(){
        int tmp = 0;
        tmp = drugCode.hashCode();
        return tmp;
    }
}
- Connection Class
This step is an extra step for avoiding repeating creating connection in each class. Create a class DrugConnection in the package tln.connection.
public class DrugConnection {
    public static Connection connection;
    static {
        try {
            String userName = "root";
            String password = "123456";
            String url = "jdbc:mysql://localhost:3306/test_linh";
            Class.forName ("com.mysql.jdbc.Driver").newInstance ();
            connection = DriverManager.getConnection(url, userName, password);
        } catch (Exception e) {
            System.err.println(e.getMessage());
        }
    }
}
- DAO Interfaces
Next we need to create some interfaces for working with Spring Dynamic Module since the consumer bundle will only talk to the provider bundle through those interfaces. In my demo, I have one generic interface and 2 other interfaces which extends that interface for specifically working with Drug and DrugGroup. Create 3 interfaces in the package tln.able.
The GenericDAO interface
public interface GenericDAO<T> {
    T save(T object);
    T update(T object);
    T get(String id);
    Collection<T> getAll();
    void delete(T object);
}
The DrugDAO interface
public interface DrugDAO extends GenericDAO<Drug> {
    List<Drug> getByDrugName(String drugName);
    Drug getByGenericName(String genericName);
    List<Drug> getByDrugGroupID(String drugGroupID);
}
The DrugGroupDAO interface
public interface DrugGroupDAO extends GenericDAO<DrugGroup> {
    DrugGroup getByDrugGroupName(String drugGroupName);
}
- Implementation Classes
Now you have the interfaces, you will need some more classes which implement those interface for Spring DM to inject it to the consumer bundle. Create 2 classes JDBCDrugDAO and JDBCDrugGroupDAO inside the package tln.impl. Of course you can create many other alternative implementation classes and later define it in the spring config file. You need to add the implementation to the example below. Also, don’t forget to crate empty constructor for them to work with Spring.
The JDBCDrugDAO class
public class JDBCDrugDAO implements DrugDAO {

    private Statement statement;
    private PreparedStatement preparedStatement;
    private ResultSet resultSet;
    private Connection connection;

    public JDBCDrugDAO() {
        try {
            connection = DrugConnection.connection;
            statement = connection.createStatement();
        } catch (SQLException e) {

        }
    }

    public Drug getByDrugCode(String drugCode) {
        ... // Implementation omitted
    }

    @Override
    public List<Drug> getByDrugName(String drugName) {
        ... // Implementation omitted
    }

    @Override
    public Drug getByGenericName(String genericName) {
		... // Implementation omitted
    }

    @Override
    public List<Drug> getByDrugGroupID(String drugGroupID) {
        ... // Implementation omitted
    }

    @Override
    public Drug save(Drug object) {
        ... // Implementation omitted
    }

    @Override
    public Drug update(Drug object) {
        ... // Implementation omitted
    }

    @Override
    public Drug get(String id) {
        ... // Implementation omitted
    }

    @Override
    public Collection<Drug> getAll() {
        ... // Implementation omitted
    }

    @Override
    public void delete(Drug object) {
        ... // Implementation omitted
    }
}
The JDBCDrugGroupDAO class
public class JDBCDrugGroupDAO implements DrugGroupDAO {

    private Statement statement;
    private PreparedStatement preparedStatement;
    private ResultSet resultSet;
    private Connection connection;

    public JDBCDrugGroupDAO() {
        try {
            connection = DrugConnection.connection;
            statement = connection.createStatement();
        } catch (SQLException e) {

        }
    }

    @Override
    public DrugGroup getByDrugGroupName(String drugGroupName) {
        ... // Implementation omitted
    }

    @Override
    public DrugGroup save(DrugGroup object) {
        ... // Implementation omitted
    }

    @Override
    public DrugGroup update(DrugGroup object) {
        ... // Implementation omitted
    }

    @Override
    public DrugGroup get(String id) {
        ... // Implementation omitted
    }

    @Override
    public Collection<DrugGroup> getAll() {
        ... // Implementation omitted
    }

    @Override
    public void delete(DrugGroup object) {
        ... // Implementation omitted
    }
}
- Spring DM Configurations
In order to use this bundle with Spring Dynamic Module, you need the Spring configuration file. Create a folder name spring inside the folder META-INF under the resources folder. Any .xml file inside this folder will be auto recognized by Spring DM Extender. Let’s create a file an xml file here named dao-context.xml with the content like this
<?xml version="1.0" encoding="UTF-8"?>
<beans xmlns="http://www.springframework.org/schema/beans"
       xmlns:xsi="http://www.w3.org/2001/XMLSchema-instance"
       xmlns:osgi="http://www.springframework.org/schema/osgi"
       xmlns:context="http://www.springframework.org/schema/context/spring-context.xsd"
       xsi:schemaLocation="http://www.springframework.org/schema/beans http://www.springframework.org/schema/beans/spring-beans-3.0.xsd http://www.springframework.org/schema/osgi http://www.springframework.org/schema/osgi/spring-osgi.xsd">
    <bean id="drugDAOService" class="tln.impl.JDBCDrugDAO"/>
    <osgi:service ref="drugDAOService" interface="tln.able.DrugDAO"/>

    <bean id="drugGroupDAOService" class="tln.impl.JDBCDrugGroupDAO"/>
    <osgi:service ref="drugGroupDAOService" interface="tln.able.DrugGroupDAO"/>
</beans>
The only special thing here compare to normal Spring is the osgi:service tag. It tells the OSGI framework that the interface declared in that tag is an OSGI service which then will be initialized using the class defined in the ref attribute.
- Compile the project
Now I’ll explain a little about the details inside the pom.xml file. One
important thing you need to remember is the <packaging> tag. You must have that
tag with bundle as the tag content, otherwise, it will not be recognized as
an OSGI bundle. Also, you need the <Export-Package> tag for the bundle to export
the packages that the consumer bundle needs. The last important thing is the the
<Import-Package> tag. Since the bundle uses library from the outside (jdbc), we
need to explicitly specify it here.
Last step is to run maven to compile and install the bundle to the local repository.
The Consumer Bundle
- Maven project
Now you have successfully created a bundle that supplies the services. Next we will create another bundle to consumer the service. Create another maven project named DrugGroup and put this inside the pom.xml file
<?xml version="1.0" encoding="UTF-8"?>
<project xmlns="http://maven.apache.org/POM/4.0.0"
         xmlns:xsi="http://www.w3.org/2001/XMLSchema-instance"
         xsi:schemaLocation="http://maven.apache.org/POM/4.0.0 http://maven.apache.org/xsd/maven-4.0.0.xsd">
    <modelVersion>4.0.0</modelVersion>

    <groupId>DrugGroup</groupId>
    <artifactId>DrugGroup</artifactId>
    <version>1.0-SNAPSHOT</version>
    <packaging>bundle</packaging>

    <dependencies>
        <dependency>
            <groupId>DAO</groupId>
            <artifactId>DAO</artifactId>
            <version>1.0-SNAPSHOT</version>
        </dependency>
    </dependencies>

    <build>
        <plugins>
            <plugin>
                <groupId>org.apache.maven.plugins</groupId>
                <artifactId>maven-compiler-plugin</artifactId>
                <version>2.0.2</version>
                <configuration>
                    <source>1.6</source>
                    <target>1.6</target>
                </configuration>
            </plugin>

            <plugin>
                <groupId>org.apache.felix</groupId>
                <artifactId>maven-bundle-plugin</artifactId>
                <extensions>true</extensions>
                <configuration>
                    <instructions>
                        <Bundle-SymbolicName>DrugGroup</Bundle-SymbolicName>
                        <Bundle-Vendor>Truong Linh Nhan</Bundle-Vendor>
                    </instructions>
                </configuration>
            </plugin>
        </plugins>
    </build>
</project>
- Executable Class
Next we need another class for calling the functions inside the provider bundle.
The Test class
package tln;

import tln.able.DrugDAO;
import tln.able.DrugGroupDAO;
import tln.model.DrugGroup;

public class Test {
    private final DrugGroupDAO drugGroupDAO;

    public Test(DrugGroupDAO drugGroupDAO){
        this.drugGroupDAO = drugGroupDAO;
    }

    public void start(){
		// calling functions in DAO
		DrugGroup drugGroup = drugGroupDAO.getByDrugGroupName("vaccin");
		// print it to the console
		...
    }

    public void stop(){
        System.out.println("stop");
    }
}
The start() function will run when the bundle is start and similarly the stop() function will be called when the bundle stops executing.
- Spring DM Configurations
Similar to the previous bundle, we need a config file for Spring Dynamic Module to receive the output from DAO Bundle. Create an .xml in the folder resources/META-INF/spring with content like this
<?xml version="1.0" encoding="UTF-8"?>
<beans xmlns="http://www.springframework.org/schema/beans"
       xmlns:xsi="http://www.w3.org/2001/XMLSchema-instance"
       xmlns:osgi="http://www.springframework.org/schema/osgi"
       xmlns:context="http://www.springframework.org/schema/context/spring-context.xsd"
       xsi:schemaLocation="http://www.springframework.org/schema/beans http://www.springframework.org/schema/beans/spring-beans-3.0.xsd http://www.springframework.org/schema/osgi http://www.springframework.org/schema/osgi/spring-osgi.xsd">

    <bean id="test" class="tln.Test" init-method="start" destroy-method="stop"
          lazy-init="false" >
        <constructor-arg ref="drugGroupDAOService"/>
    </bean>

    <osgi:reference id="drugGroupDAOService" interface="tln.able.DrugGroupDAO"/>
</beans>
- Compiling the project
Last step is to compile the project with Maven.
Deploy the project in OSGI
- Felix
To deploy an application in OSGI, you need an OSGI container. In this example, I used Felix. You can download felix from here. Extract it and rename it to felix. After that, copy that folder into a folder named my-osgi. Open Terminal and cd to the felix folder, use this command to start felix
$ java -jar bin/felix.jar- Spring DM Libraries
In order to use Spring DM, you need to download its libraries here or you find it in my github repository. Copy all those .jar files into the my-osgi folder you’ve just created before.
Back to Terminal, install all these bundles into felix following this instruction
Welcome to Apache Felix Gogo

g! install file:../com.springsource.slf4j.org.apache.commons.logging-1.5.0.jar
Bundle ID: 5
g! install file:../com.springsource.slf4j.log4j-1.5.0.jar
Bundle ID: 6
g! install file:../com.springsource.slf4j.api-1.5.0.jar
Bundle ID: 7
g! install file:../log4j.osgi-1.2.15-SNAPSHOT.jar
Bundle ID: 8
g! install file:../com.springsource.net.sf.cglib-2.1.3.jar
Bundle ID: 9
g! install file:../com.springsource.org.aopalliance-1.0.0.jar
Bundle ID: 10
g! install file:../org.springframework.core-2.5.6.SEC01.jar
Bundle ID: 11
g! install file:../org.springframework.context-2.5.6.SEC01.jar
Bundle ID: 12
g! install file:../org.springframework.beans-2.5.6.SEC01.jar
Bundle ID: 13
g! install file:../org.springframework.aop-2.5.6.SEC01.jar
Bundle ID: 14
g! install file:../spring-osgi-extender-1.2.1.jar
Bundle ID: 15
g! install file:../spring-osgi-core-1.2.1.jar
Bundle ID: 16
g! install file:../spring-osgi-io-1.2.1.jar
Bundle ID: 17
g! start 5 7 8 9 10 11 12 13 14 15 16 17
log4j:WARN No appenders could be found for logger (org.springframework.osgi.extender.internal.activator.ContextLoaderListener).
log4j:WARN Please initialize the log4j system properly.
Open the target folder inside the root directories of the two projects you’ve have just created before and copy the 2 compiled .jar file there into the my-osgi folder. Back to the felix prompt in Terminal and install those 2 bundle
g! install file:../DAO-1.0-SNAPSHOT.jar
Bundle ID: 18
g! install file:../DrugGroup-1.0-SNAPSHOT.jar
Bundle ID: 19
You can use the command lb, which stands for list bundle to view all installed bundles as well as their status
Finally, start the two bundle to see the results
g! start 18
g! start 19
Download Link
You can clone the source code from github https://github.com/tmtxt/osgi-springdm-jdbc
Reference Links
http://www.baptiste-wicht.com/2010/07/osgi-spring-dynamic-modules-hello-world/