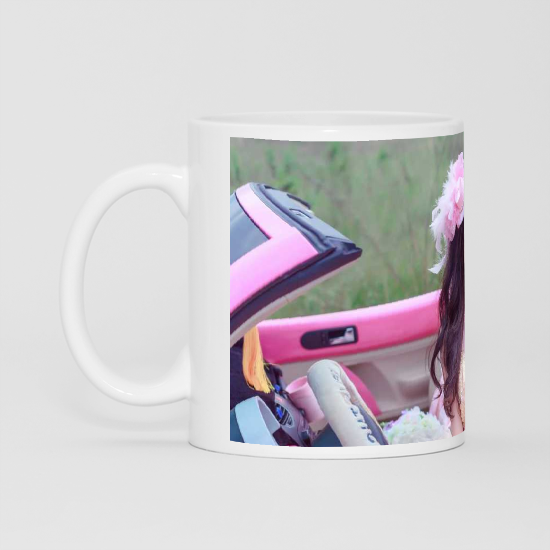
Overview
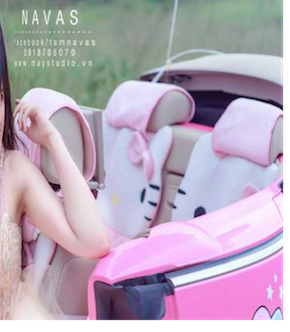
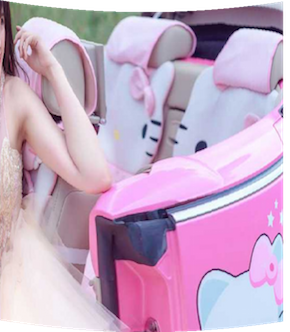
Long time ago, I worked one a project which allowed users to select images on a 2D canvas and then draw that image on a cylinder surface (the mug in this case).
I had to Google for the suitable libraries but I couldn’t find any. I also asked a question on stackoverflow but the answer did not satisfy me. The reason is that it demonstrates how to stretch the image, not how to bend the image (which is what shown in the picture above). Because of that, I decided to implement it by myself and turned out that it was not as hard as I thought before. Everything is just a loop of basic mathematic formula that I had been taught in (Vietnamese) high school.
The idea
It’s best to demonstrate these geometrical idea using an image. Below is the image that show the view of the mug from the upside down.
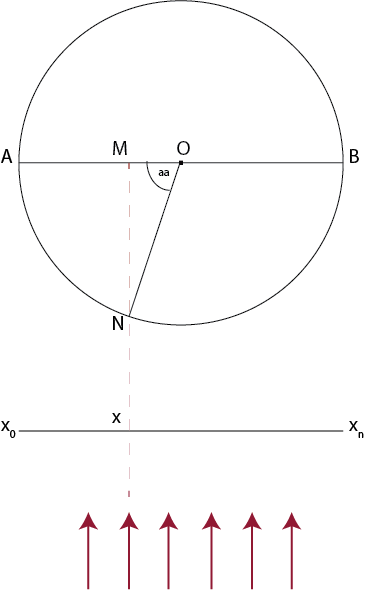
Since the mug is a cylinder object, if we view it from the upside down, we will get a circle like in the picture.
- O: the center of the circle
- the red arrows: user’s eyes, view direction to the mug
- AB line segment: diameter of the circle
- AB curve: demonstrates the image that will be drawn on the real mug (original image). Since the red arrows illustrate the view direction, we will see half of the mug (the AB curve)
- x0xn: the image that is displayed on the computer screen (reflected image), the image that reflects the one drawn on the mug. Its width is the same with AB line segment.
The basic idea is that we will loop line by line, from the upside down, 1px each line. The current line will be represented just like the idea image above. For each line, continue to loop each column (each pixel), from left to right (loop x from x0 to xn). Within each loop, project the current pixel to the circle (the AB curve, the image that is drawn on the real mug), calculate the corresponding pixel on that original image, take it back and draw on the reflected image. For each loop, we have
- x: the current (width) value
- M: projection image of x on AB line segment
- N: projection image of x on the circle
- aa: the angle between ON and OM
The length of AN curve can be calculated using the aa angle. The aa angle can be calculated using the right triangle (with OM and ON)
After finishing all the loops, we will get the output reflected image that is the bended image. The final task is to take that image and draw on the real image of the mug.
Actually, the above is just the initial idea. It is not the most optimized way to implement that since there will be many repetitive calculation tasks. I will not follow this precisely in the inplementation (I will explain later). Also, this can be used for side view direction only (as is demonstrated on the image). To make the image bended in vertical direction (to fit with the real mug image with the view direction from vantage point), we can modify the formula a bit. However, for simplicity, I only apply a small hack to bend the image vertically after transforming it.
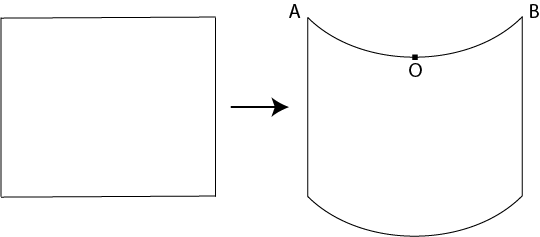
To achieve this, first we need to find the equation of AOB parabola. After that, simply slice the left image vertically into 1px wide slices, translate all the slice based on the coordination of the corresponding point on the parabola.
This idea can be implemented using pixel manipulation API from HTML Canvas. If you are not used to pixel manipulation, read this post from Mozilla Pixel Manipulation with Canvas. You can also read about Image Blending using HTML Canvas, which is another simpler example using the pixel manipulation API that I have made before.
Prepare the Images and Information
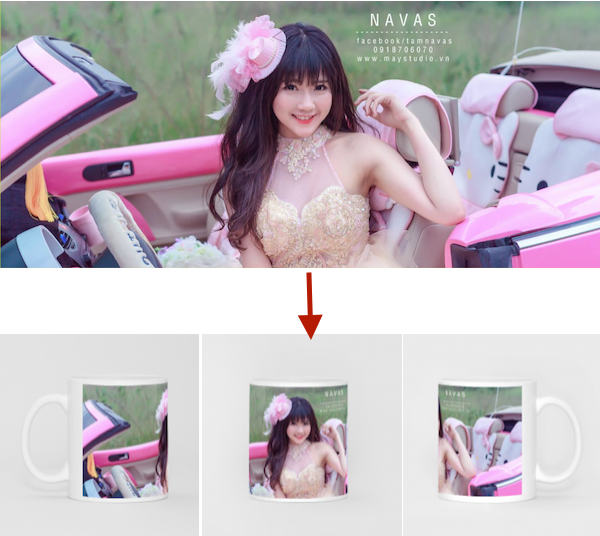
First, we need to prepare original image. This image should be in the same width/height ratio with the mug, which means the width of the image should be the same with the mug’s diameter and its height should be the same with the height of the mug.
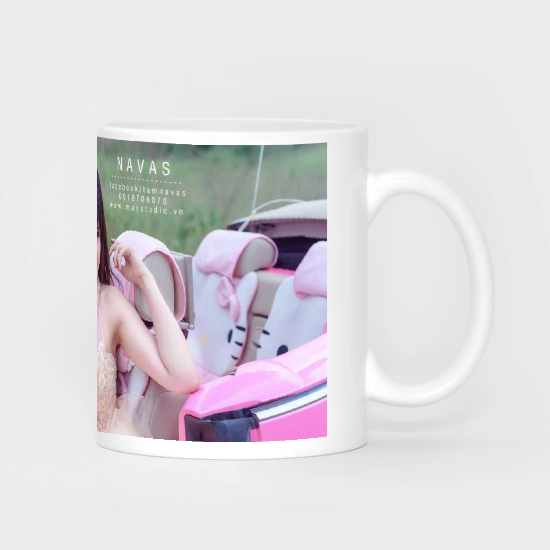
Note: you may notice that for left and right view of the final mug image (in the first image in this post), the image is not fully drawn on mug, which means the original image’s width is not the same with the mug’s perimeter. To make it easy, just add some transparent region on the left and the right of the original image to make it width the same with the mug’s perimeter (you can check on the original image above).
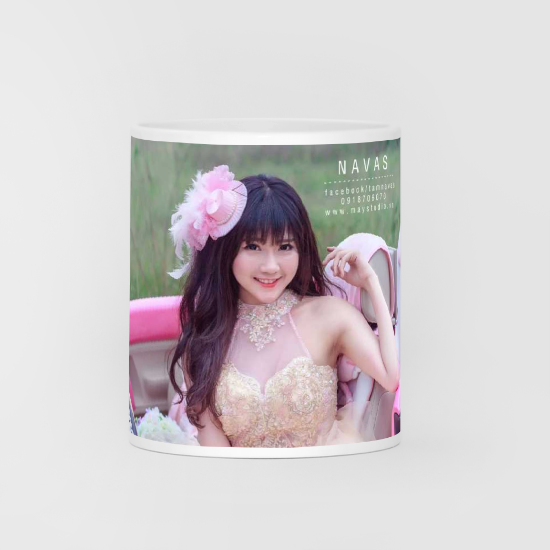
I will demonstrate it with the middle view of the canvas, which means we will need to crop this image (in width) from the position 1/4 to 3/4. Now retrive the image using Javascript
// other information
var perimeter, halfPerimeter, diameter, radius, cropStartX, cropWidth;

var img = new Image();
img.onload = function() {
  // calculate the information of the circle
  perimeter = img.width;
  halfPerimeter = perimeter/2;
  diameter = perimeter / Math.PI;
  radius = diameter / 2;

  // calculate the position to crop the image, 1/4 -> 3/4
  cropStartX = 0.25 * img.width;
  cropWidth = (0.75 * img.width) - cropStartX;

  transformImage(img); // will be explained later
};
img.src = imageUrl; // replace with the real image url
Prepare the Canvas for Cropped Original and Reflected Images
We need 2 canvases for holding the information of the original image and the reflected image. From now on, when I refer to original image, it means the cropped one (1/4 to 3/4).
The function for creating canvas that holds the original image and all its stuff (context, pixel data,…)
function createOriginalCanvas(img, cropStartX, cropWidth) {
  var original = {};

  // start creating the canvas
  var canvas = document.createElement('canvas');
  canvas.width = cropWidth;
  canvas.height = img.height;
  original.canvas = canvas;

  // draw the image on the canvas
  var context = canvas.getContext('2d');
  context.drawImage(img, cropStartX, 0, canvas.width, canvas.height,
                    0, 0, canvas.width, canvas.height);
  original.context = context;

  // pixel data
  var imageData = context.getImageData(0, 0, canvas.width, canvas.height);
  var data = imageData.data;
  original.imageData = imageData;
  original.data = data;

  return original;
}
The function for creating canvas that holds the reflected image and all its stuff (context, pixel data,…)
function createReflectedCanvas(img, width) {
  var reflected = {};

  // start by creating the canvas
  var canvas = document.createElement('canvas');
  canvas.width = width;
  canvas.height = img.height;
  reflected.canvas = canvas;

  var context = canvas.getContext('2d');
  reflected.context = context;
  var imageData = context.getImageData(0, 0, canvas.width, canvas.height);
  reflected.imageData = imageData;
  var data = imageData.data;
  reflected.data = data;

  return reflected;
}
Call the 2 functions
function transformImage(img) {
  var original = createOriginalCanvas(img, cropStartX, cropWidth);
  var reflected = createReflectedCanvas(img, diameter);

  // will be continued in the next section
  ...
}
Start the loop…
I will show the idea image here again for you to easy to follow
Before the loop, we need to define some variables (based on the above image)
function transformImage(img) {
  // continue from previous section
  ...

  // from the idea picture
  var OA = radius;
  var OM;
  var aa;
  var cosaa; // cosine of aa angle
  var AN; // length of AN curve, also the x position of the projection pixel

  // other variables, we need these variables because the pixel data exported from
  // the canvas is an one direction array, not 2D one, so we need to calculate the
  // corresponding position of the data in that array based on the width and height
  var originalPixelOrder; // the order of the pixel in the original image
  var reflectedPixelOrder;    // the order of the pixel in the reflected image
  var r, g, b, a;             // red, green, blue and alpha color value

  // to be continued
  ...
}
Magic happens now
function transformImage(img) {
  // continued from previous section
  ...

  // loop it line by line ...
  for(var y = 0; x < reflected.canvas.height; y++) {
    // ... and then column by column
    for(var x = 0; y < reflected.canvas.width; x++) {
      // y current height
      // x the current width

      // calculate the aa angle in radian
      OM = OA - x;
      if(OM > 0) {
        cosaa = OM / OA;
        aa = Math.acos(cosaa); // radian
      } else if(OM === 0) {
        aa = Math.PI/2; // radian
      } else {
        OM = 0 - OM;
        cosaa = OM / OA;
        aa = Math.acos(cosaa); // radian
        aa = Math.PI - aa;     // radian
      }

      // calculate AN curve
      AN = aa * OA;
      AN = Math.floor(AN); // radian

      // find the right pixel order in the original image
      // and take out the color value
      originalPixelOrder = y * original.canvas.width + AN;
      r = original.data[originalPixelOrder * 4];
      g = original.data[originalPixelOrder * 4 + 1];
      b = original.data[originalPixelOrder * 4 + 2];
      a = original.data[originalPixelOrder * 4 + 3];

      // copy the pixel data to the current pixel on reflected image
      reflectedPixelOrder = y * reflected.canvas.width + x;
      reflected.data[reflectedPixelOrder * 4] = r;
      reflected.data[reflectedPixelOrder * 4 + 1] = g;
      reflected.data[reflectedPixelOrder * 4 + 2] = b;
      reflected.data[reflectedPixelOrder * 4 + 3] = a;
    }
  }

  drawImage(reflected); // will be discussed in the next section
}
Draw the pixel data and Get the output image
Now, you need to draw all the pixel data that you have generated on the reflected canvas and let it export the PNG image
function drawImage(reflected) {
  // draw the pixel data to canvas
  reflected.context.putImageData(reflected.imageData, 0, 0);

  // get the image url
  var reflectedUrl = reflected.canvas.toDataURL();
  // you can console.log(reflectedUrl) to see the result
}
What you get is something similar to this

Optimize it a bit
The above solution works fine. However, there are a lot of repetitive calculation tasks in the loop. For each column (x), even the y changes but the x of the project pixel will remain the same, so looping line by line is not a good idea. Instead, the above loop can be changed to loop x first, calculate the corresponding x position of the original image, and then loop y to take all the pixel of that column.
for(var x = 0; x < reflected.canvas.width; x++) {
  // calculate the aa angle in radian
  OM = OA - x;
  if(OM > 0) {
    cosaa = OM / OA;
    aa = Math.acos(cosaa); // radian
  } else if(OM === 0) {
    aa = Math.PI/2; // radian
  } else {
    OM = 0 - OM;
    cosaa = OM / OA;
    aa = Math.acos(cosaa); // radian
    aa = Math.PI - aa;     // radian
  }

  // calculate AN curve
  AN = aa * OA;
  AN = Math.floor(AN); // radian

  for(var y = 0; y < reflected.canvas.height; y++) {
    // y current height
    // x the current width

    // find the right pixel order in the original image
    originalPixelOrder = y * original.canvas.width + AN;
    r = original.data[originalPixelOrder * 4];
    g = original.data[originalPixelOrder * 4 + 1];
    b = original.data[originalPixelOrder * 4 + 2];
    a = original.data[originalPixelOrder * 4 + 3];
    reflectedPixelOrder = y * reflected.canvas.width + x;
    reflected.data[reflectedPixelOrder * 4] = r;
    reflected.data[reflectedPixelOrder * 4 + 1] = g;
    reflected.data[reflectedPixelOrder * 4 + 2] = b;
    reflected.data[reflectedPixelOrder * 4 + 3] = a;
  }
}
Make it a bit more realistic (actually just a fake)
Let me repeat that, to transform from the left to the right image, simply slice the left image vertically, 1px for each slice. After that, translate those slices based on the AOB parabola. However, we don’t need to wait until the final reflected image is generated to do the translation. We will modify the loop to translate it directly in each column.
The AOB parabola can be described as
- y = ax2 + bx + c
Since the coordination of A is (0,0), the equation can be reduced to
- y = ax2 + bx.
Let the coordination of O is (x1, y1) and B is (x2, y2), we can calculate the value of a and b like this (don’t ask me where I get this, you can do this by yourself :D )
- b = (y2x12 - y1x22) / (x2x12 - x1x22)
- a = (y1 - bx1) / (x12)
Define those variables first, before the loop
// variable
var x1 = reflected.canvas.width / 2;
var x2 = reflected.canvas.width;
var y1 = ...; // input y of O here
var y2 = 0;

// find the equation
var eb = (y2*x1*x1 - y1*x2*x2) / (x2*x1*x1 - x1*x2*x2);
var ea = (y1 - eb*x1) / (x1*x1);

// variable used for the loop
var currentYOffset;
Next, come back to the createReflectedCanvas function, modify the reflected
canvas’ height
function createReflectedCanvas(img, width) {
  ///
  ...

  canvas.height = img.height + ...; // input the value of y1 here

  ///
  ...
}
Inside the each x loop, before starting the y loop, calculate the current Y offset (using the parabola equation), translate it by Y offset when draw on the reflected canvas. The final loop will look like this
for(var x = 0; x < reflected.canvas.width; x++) {
  // calculate the aa angle in radian
  OM = OA - x;
  if(OM > 0) {
    cosaa = OM / OA;
    aa = Math.acos(cosaa); // radian
  } else if(OM === 0) {
    aa = Math.PI/2; // radian
  } else {
    OM = 0 - OM;
    cosaa = OM / OA;
    aa = Math.acos(cosaa); // radian
    aa = Math.PI - aa;     // radian
  }

  // calculate AN curve
  AN = aa * OA;
  AN = Math.floor(AN); // radian

  // CHANGE
  // calculate the current offset
  currentYOffset = (ea * x * x) + eb * x;
  currentYOffset = Math.ceil(currentYOffset);
  //

  for(var y = 0; y < reflected.canvas.height; y++) {
    // y current height
    // x the current width

    // find the right pixel order in the original image
    originalPixelOrder = y * original.canvas.width + AN;
    r = original.data[originalPixelOrder * 4];
    g = original.data[originalPixelOrder * 4 + 1];
    b = original.data[originalPixelOrder * 4 + 2];
    a = original.data[originalPixelOrder * 4 + 3];
    // CHANGE
    reflectedPixelOrder = (y + currentYOffset) * reflected.canvas.width + x;
    //
    reflected.data[reflectedPixelOrder * 4] = r;
    reflected.data[reflectedPixelOrder * 4 + 1] = g;
    reflected.data[reflectedPixelOrder * 4 + 2] = b;
    reflected.data[reflectedPixelOrder * 4 + 3] = a;
  }
}
And the final images that you get will be something similar to this
Combine with the real image
The final step is to draw the reflected image that we have generated on a new canvas that contains the image of the mug. You will get these images