Image Blend modes and HTML Canvas
Image Blend modes are the methods used to determine how 2 image layers are blended (mixed) to each other. As the digital images are stored in pixel, which are represented by numerical values, there are a large number of possible ways for blending based on the mathematical functions. With the help of Canvas API, now we can easily retrieve the images, export all the pixels on the image, apply blending effect, calculate to get the new blended pixels, export and display the new image on the web or save to server.
In this post, I will demonstrate some basic steps for applying Image Blend modes using HTML canvas API.
The Logic
Wikipedia already listed some popular blending methods here Blend Modes.
Assume that we have two image layers, top layer and bottom layer. For each loop, a is the value of a color channel in the underlying layer and b is that of the corresponding channel of the upper layer, we got the function for calculating the new pixel ƒ(a, b).
The steps for generating the new blended image from the two images are
- First, retrieve those two images
- Create two separate canvases with the same size and draw those two images into the corresponding canvas.
- Get all the pixel data from the two canvases.
- Loop through each pixel, apply the blending function to create a new pixel and store it inside an array
- Create a new canvas with the same size, use the blended pixel data to draw the blended image on that new canvas
- Export the canvas to image, file to save to server or to local computer.
Note: I mentioned that we need to create two canvases with the same size. However, that is just to make it easy for the demonstration purpose. You can still generate two canvases with different size, but you will need to change the calculation function a bit.
Retrieve the Images
Firstly, you need to fetch the images from outside to the memory for processing. The images can be either from the internet, a data URI string or even from local file (if the File API is supported in your browser).
var bottomImage, topImage;

bottomImage.onload = function() {
  topImage.onload = function(){
    // finish loading two images here, call the function to process the data
    drawImagesOnCanvas(bottomImage, topImage);
  };
  topImage.src = 'http://example.com/img2.png';
};
bottomImage.src = 'http://example.com/img1.png';
In the above example, I used the normal callback to load the images so it looks a bit ugly. Try to eliminate the pyramid by yourself :D
Instead of loading images from an URL, you can also load them from a data url string, for example
img1.src = 'data:image/png;base64,iVBORw0KGgoAAAANSUhEUgAAAkIAAADICAYAAAAEE46XAAAgAElEQVR4Xu2dXZBU1bXH17zFWxUrkreBqqhgBb0aNXGIL1dQo';If your browser supports File API, you can also load the image from the files on local computer using URL.createObjectURL. See this page for example URL.createObjectURL.
Draw Images and Get Pixel Data
Now, we will create two canvas elements using the normal document.createElement function. You only need to create the two canvases and they are not necessarily be appended to the web page to work properly (actually you shouldn’t append them).
function drawImagesOnCanvas(bottomImage, topImage){
  // create canvases
  var bottomCanvas = document.createElement('canvas');
  var topCanvas = document.createElement('canvas');

  // set the size for them, for example 500x500 pixels
  bottomCanvas.width = 500;
  bottomCanvas.height = 500;
  topCanvas.width = 500;
  topCanvas.height = 500;

  // more will be presented later
  ...
}
Next, draw the images that we have loaded before to those canvases. In order to
do that, you need to get the 2d context from the canvases. After finishing
drawing, get the image data (represent the pixels information of the canvas)
using the getImageData method of the 2d context.
function drawImagesOnCanvas(bottomImage, topImage){
  // continue from the above
  ...

  // get the 2d context to draw
  var bottomCtx = bottomCanvas.getContext('2d');
  var topCtx = topCanvas.getContext('2d');

  // draw the image to top and bottom canvas, from the position x, y (0, 0) and
  // with the size 500, 500 pixels
  bottomCtx.drawImage(bottomImage, 0, 0, 500, 500);
  topCtx.drawImage(topImage, 0, 0, 500, 500);

  // get the pixel data of the 2 canvas, from the position x, y (0, 0) and
  // with the size 500, 500 pixels
  var bottomImageData = bottomCtx.getImageData(0, 0, 500, 500);
  var topImageData = topCtx.getImageData(0, 0, 500, 500);

  // apply blending, will be discussed in the next section
  applyBlending(bottomImageData, topImageData);
}
You can read this page for more information about the parameter passed to
drawImage and getImageData function.
Apply Blending method
Now, you need to create a new canvas for processing the new image. Again, you don’t necessarily need to append this canvas to the document’s body.
function applyBlending(bottomImageData, topImageData) {
  // create the canvas
  var canvas = document.createElement('canvas');
  canvas.width = 500;
  canvas.height = 500;
  var ctx = canvas.getContext('2d');

  // will be more
  ...
}
Next, loop through the pixel data and apply the desired blending function to generate the new pixel data and then draw it on on the new canvas. The pixel data array is a little special. In this example, our image size is 500x500 pixel, 250,000 pixels in total. However, the pixel data array will have 250,000 x 4 elements. This is because each pixel is represented by 4 value: (R, G, B, A), 4 continuous elements in the pixel data array.
The demonstration uses the multiply blending method with the formula
ƒ(a, b) = a*b. That means the new R value is (Ra * Rb) / 255. The same logic
will be applied for other color value.
function applyBlending(bottomImageData, topImageData) {
  // continue from the above
  ...

  // get the pixel data as array
  var bottomData = bottomImageData.data;
  var topData = topImageData.data;

  // loop each pixel data, calculate the new pixel value and assign it directly
  // to the topData (to save memory)
  // if you want to keep the original data, don't do this. instead create a new
  // image data object
  for(var i = 0; i < topData.length; i += 4) {
    topData[i] = topData[i] * bottomData[i] / 255;
    topData[i+1] = topData[i+1] * bottomData[i+1] / 255;
    topData[i+2] = topData[i+2] * bottomData[i+2] / 255;
  }
  // draw it on the canvas with the size 500, 500
  ctx.putImageData(topImageData, 500, 500);

  // export image, discussed in the next part
  exportImage(canvas);
}
Export the Blended Image
You have successfully apply Blend mode using HTML Canvas (multiply for specific in this case). However, the canvas is not visible yet and you still cannot see the result. The final step is to transform the hidden canvas to a visible item. There are many ways of doing this, select the one that is most suitable for you
function exportImage(canvas) {
  // append it to the document's body to see
  document.body.appendChild(canvas);

  // or export the base64 data url string
  var dataUrl = canvas.toDataURL();
  // on modern browser, you can just print the data url, open the console and
  // click on it, the browser will generate the image for you
  console.log(dataUrl);

  // or create a new image element from the data url
  var img = document.createElement('img');
  img.setAttribute('src', dataUrl);
  img.onload = function(){
    document.body.appendChild(img);
  };

  // if you don't want to submit the base64 string and convert it back
  // to image on the server, you can convert the data url to a file and then
  // submit to server (if your browser supports File API)
  var binary = atob(dataUrl.split(',')[1]);
  var array = [];
  for(var i = 0; i < binary.length; i++) {
    array.push(binary.charCodeAt(i));
  }
  var file = new Blob([new Uint8Array(array)], {type: 'image/png'});
  // use the FormData to submit it (with jquery or XMLHttpRequest)
}
Demo
This is created using the above example. Here are the two original images.
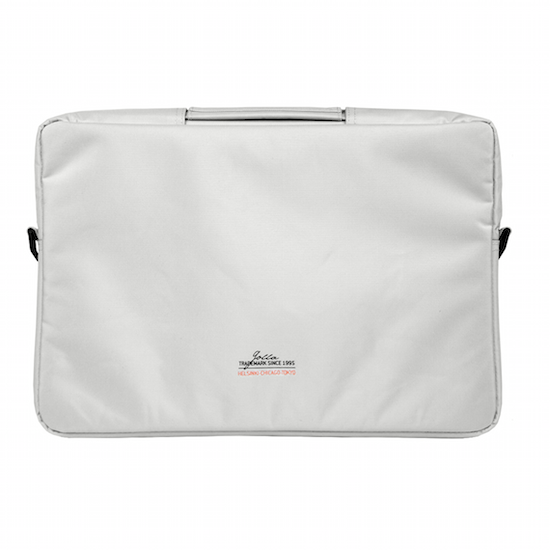
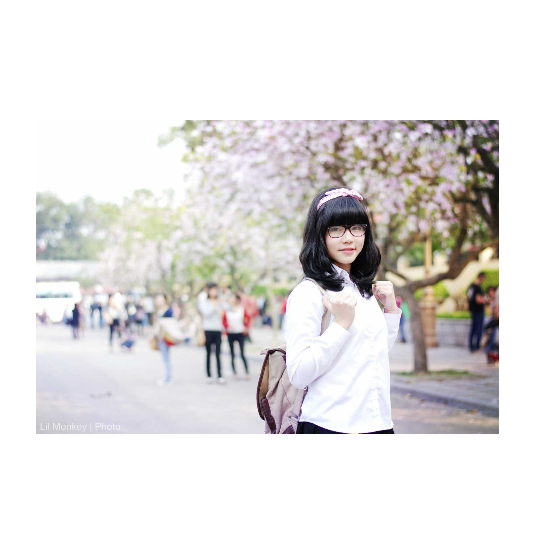
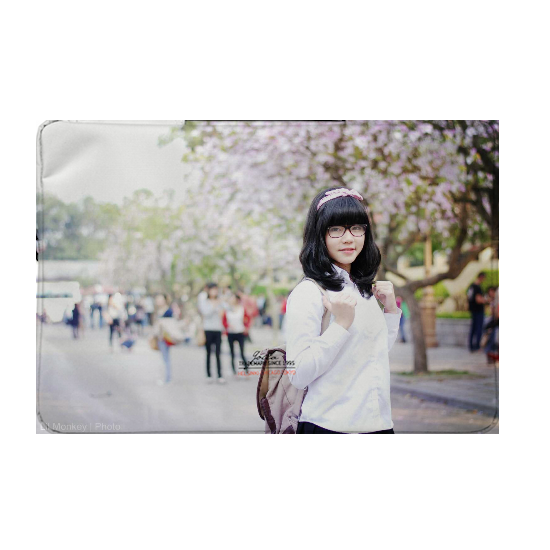
After applying blending method for these 2 images, I got this image. Note that I used multiply blend mode for this example, so any transparent pixel on either top or bottom will produce the corresponding transparent pixel on the final image (since all the RGB value is 0, and anything times 0 is 0). That’s why you see the below image got transparent at the two sides
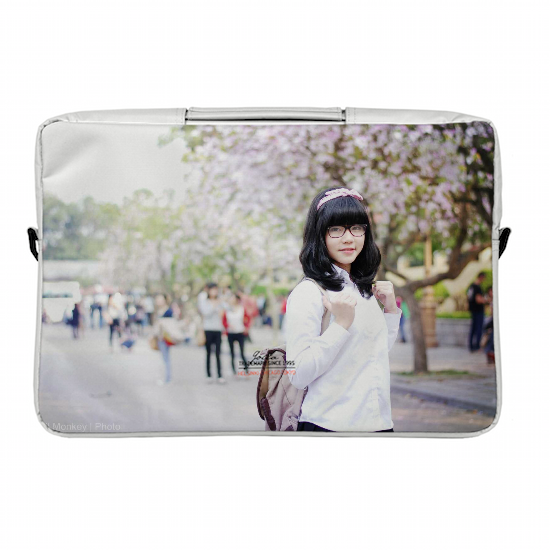
Finally, I use this overlay image with transprent center region (the region inside the bag)…
… and draw it over the blended image, I got this one, notice the top left of the bag and text in the middle of the bag