Firewall on Linux server
I’m working on a project that uses Clojure. Usually, for these kind of project, I will open up an nREPL server for inspecting the web app while fixing bug. However, the problem is that the nREPL server seems to allow all kind of connections, from the local connections to the external ones without prompting for password. I also have a Neo4j instance running the graph database used for the website on another port and sometimes I need access to its web interface to look up the data inside the graph. That leads me to the need of setting up a firewall on my VPS to block all untrusted connections.
iptables seems to be the most popular firewall tool on Linux server out there. However, working with the complex iptables table rules through the command line can be a bit struggling. Fortunately, there is ferm, an utility tool that helps you maintain complex firewalls, without having the trouble to rewrite the complex rules over and over again. It allows the entire firewall rule set to be stored in a separate file, and to be loaded with one command.
Organize ferm with Ansible
Usually, the Ansible config for each project consists of some roles that is reusable among projects and the custom tasks for that project (as I mentioned before in this post Vagrant and Ansible - Organize for reusability). In order to apply that structure, we need to an Ansible role for installing ferm and generate a default config file for it. That config file should have some directives for including the per project config file. In each project, there will be some Ansible tasks in each project for defining particular firewall rule for that project.
The ferm role
As I mentioned earlier, the config file need to define some directives for automatic loading of per project config file. It’s best to create another folder for that, put all the config files for specific projects there and have all of them included in the main config file. The main ferm config file will look similar to this
- ferm.conf
table filter {
    chain INPUT {
        # include all files in input folder
        @include 'input/';
    }
    chain OUTPUT {
        # include all files in output folder
        @include 'output/';
    }
    chain FORWARD {
         # include all files in forward folder
         @include 'forward/';
    }
}
This config file will be part of the ferm role and can be re-used for multiple project. Here is the main task file of this role
- main.yml
---
- name: install ferm dependencies
  sudo: yes
  apt: name={{item}}
  with_items:
    - iptables
    - ferm

- name: add ferm config directory
  sudo: yes
  file: path={{item}} owner=root group=root mode=0700 state=directory
  with_items:
    - /etc/ferm
    - /etc/ferm/input
    - /etc/ferm/output
    - /etc/ferm/forward

- name: add ferm default config file
  sudo: yes
  template: >-
    src=ferm.conf
    dest=/etc/ferm/ferm.conf
You can take a look at a sample ferm role that I defined here.
Ferm config file for each project
Now you have ferm installed on your server and the main ferm file that will
include all files in one of the three folders (input, output and forward).
The task for each project is to define the rule and put it into the
corresponding folder. The config file will look like this
- myproject.conf
# block these ports (9250, 9251, 9252,...)
proto tcp dport (9250 9251 9252) DROP;

# open these ports if inside vagrant environment (you need to define vagrant_env variable first)
{% if vagrant_env %}
proto tcp dport (9253 9254) ACCEPT;
{% endif %}- tasks.yml
- hosts: all
  roles:
    - ferm

  tasks:
    - name: generate ferm config file for project
      sudo: yes
      template: >-
        src=myproject.conf
        dest=/etc/ferm/input/myproject.conf
      notify:
        - reload ferm

  handlers:
    - name: reload ferm
      sudo: yes
      command: ferm /etc/ferm/ferm.conf
Here is a project that I used this approach https://github.com/tmtxt/clojure-pedigree/tree/master/ansible. Feel free to take it yourself.
Extra: Connect to restricted services when firewall enabled
There will be the case when you want to connect to one of your service that is blocked by the firewall on the server (for example debugging purpose). If you are in that case, you can set up an SSH Tunnel between your computer and the server. All connections through that tunnel will be recognized as local ones by the server.
First, you need to make sure that the forwarding option is enabled by your ssh
service on the server. Usually, it is enabled by default. If not, change the
parameter AllowTcpForwarding no in your server’s /etc/ssh/sshd_config file to
yes and restart the ssh service.
Next, ssh into your server with this command
$ ssh -D 12345 user@hostThat will start a SOCKS proxy server in your computer, listening on port 12345. Now, everything you need to do is to config your browser or your tool to connect through that proxy server
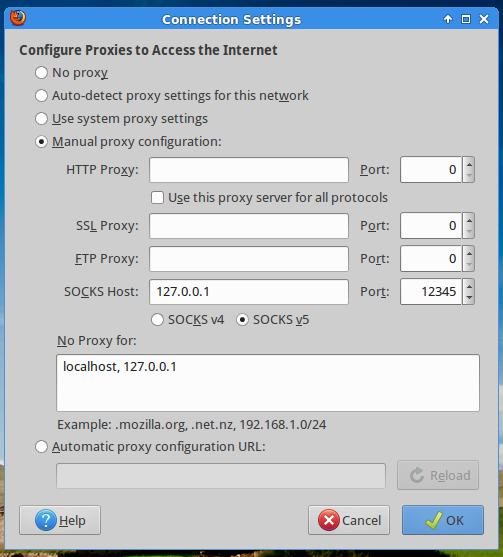
The images is taken from a tutorial on Linode. You can read the full tutorial here Setting up an SSH Tunnel with Your Linode for Safe Browsing.