Setting up ssl connection can be different for different kinds of server. To make the configuration process easier, we can use nginx as a https proxy server. In this design, the client connects to the nginx server using https with encrypted data. After that, nginx decrypts the data and forwards it to the real web server (also running locally in the same server with nginx). This post demonstrates the steps for configuring nginx as an https proxy server.
Installation
First, you need to install nginx with ssl support. On Mac OS, by default, Macports does not install ssl for nginx, you need to use this command
$ port install nginx +sslNext, you need to find out the configuration file for nginx. Usually, it is
located under /etc/nginx (or /opt/local/etc/nginx for macports version).
There are already some sample configuration files with the .default extension
there for you. You can use those sample config files by removing the .default
extension.
Usually, you don’t put all the settings in nginx.conf file. Instead, you can
create another directory for storing your own ones and include them in the main
config file. For example, you put all your config files inside site-enabled
folder, add this inside the http section of the nginx.conf file.
http {

    # ...
    # other config
    # ...

    include sites-enabled/*;
}
Config http proxy server using nginx
Now you have nginx installed in your computer. First, we’ll try to config nginx
as an http proxy server. Follow the previous example, create a new file in the
site-enabled directory (myconf for example). Add a server section like
this
server {
       listen 8080;
       server_name mydomain.com;

       location / {
                proxy_pass http://localhost:3000;
       }
}
The setting above indicate that it will listen on port 8080 or host name
mydomain.com. The port is for clients to connect through ip address, and the
server_name is for connecting to through DNS domain name or using hosts file. For
every request to nginx server, it will redirect the connection to
http://localhost:3000, which is another server running in the same machine with
nginx. To test the connection, you need to start both nginx and the web server
at port 3000. You may need sudo for starting nginx. Next, open the browser and
type in http://127.0.0.1:8080 and see whether it redirects to the web server.
Also, you can edit the hosts file (usually in /etc/hosts), add 127.0.0.1
mydomain.com and connect through that domain http://mydomain.com.
Create Certificate
Before you can proceed to the next step (setting up https for nginx), you need to create an SSL certificate for your server.
$ mkdir certificate
$ cd certificate
$ openssl genrsa -des3 -out server.key 1024
The last command will prompt for a passphrase. Make sure that you remember this passphrase for later use. Next, creating a signing request using this command
$ openssl req -new -key server.key -out server.csrThis will ask you several questions. The first few entries you can leave them blank. The most important line is “Common Name”. Enter your official domain name here or, if you don’t have one yet, your site’s IP address. Leave the challenge password and optional company name blank.
Enter pass phrase for server.key:
You are about to be asked to enter information that will be incorporated
into your certificate request.
What you are about to enter is what is called a Distinguished Name or a DN.
There are quite a few fields but you can leave some blank
For some fields there will be a default value,
If you enter '.', the field will be left blank.
-----
Country Name (2 letter code) [AU]:
State or Province Name (full name) [Some-State]:
Locality Name (eg, city) []:
Organization Name (eg, company) [Internet Widgits Pty Ltd]:
Organizational Unit Name (eg, section) []:
Common Name (e.g. server FQDN or YOUR name) []:ExampleName
Email Address []:

Please enter the following 'extra' attributes
to be sent with your certificate request
A challenge password []:
An optional company name []:
Finally, you need self-sign your certificate (in reality, you need to give this certificate to a Certificate Authority). By using the below command, you specify that this certificate will expire after 365 days.
$ openssl x509 -req -days 365 -in server.csr -signkey server.key -out server.crt
Signature ok
subject=/C=AU/ST=Some-State/O=Internet Widgits Pty Ltd/CN=ExampleName
Getting Private key
Enter pass phrase for server.key:
Setting up https for nginx
Continue with the myconf file in the previous example, add one more server
section for the https server. Change the /path/to/server.crt and
/path/to/server.key to the correct path to server.crt and server.key file
you created in the last step.
server {
       listen 443 ssl;
       server_name      pedigree;

       ssl_certificate /path/to/server.crt;
       ssl_certificate_key /path/to/server.key;

       location / {
                proxy_pass http://localhost:3000;
       }
}
You need to restart nginx for the changes to take place.
$ sudo pkill nginx
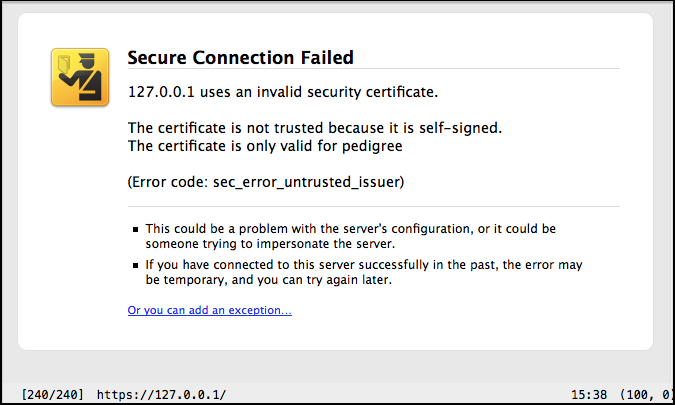
$ sudo nginxNow open the browser and access https://127.0.0.1. Your browser should display
something similar to this and ask you to add ssl exception.
If you want to force the clients to use https when access certain location, you
can use rewrite to change the request from http to https server. Refer to the
server section you have added in the first step (for http server), inside that
section, add one more location config for that path that you want to force.
server {
    # ...
    # other config
    # ...

    location /login {
        rewrite ^ https://$host/login permanent;
    }
}
The above config tells nginx that whenever a user access to /login using http,
it will be redirected to that same location but using https. Now restart nginx
and open the browser, try to access http://127.0.0.1:8080/login and see the
result.
Extra
Here is the link to the sample config file used for the above example. You can view it directly in the browser at this link.
For Emacs users, Emacs has a built-in mode for config file called conf-mode. Simply put this
line in the beginning of the nginx setting file for Emacs to auto activate
conf-mode when visit that file
# -*- mode: conf -*-